

Seguridad en Soldadura: Cómo conseguir soldaduras de alta calidad - Cómo limpiar y evitar la acumulación de proyecciones en la boquilla de su antorcha MIG (WeldSafe Essentials 21)
La acumulación de salpicaduras es uno de los problemas de mantenimiento más constantemente ignorados en la soldadura MIG/MAG. Es fácil descartarlo como algo cosmético. No lo es. Una vez que las salpicaduras se acumulan dentro de la boquilla de la antorcha, interrumpen directamente el flujo de gas de protección - y una envoltura de gas comprometida significa porosidad, oxidación y fusión inconsistente, incluso si todos los demás parámetros están marcados correctamente.
En este número de WeldSafe Essentials, repasamos por qué se acumulan las salpicaduras, lo que realmente hacen a la calidad de la soldadura y la forma correcta de limpiarlas - incluyendo el error que vemos constantemente en el taller y que acorta silenciosamente la vida útil de la antorcha.
Por qué se acumulan las salpicaduras (y por qué son importantes)
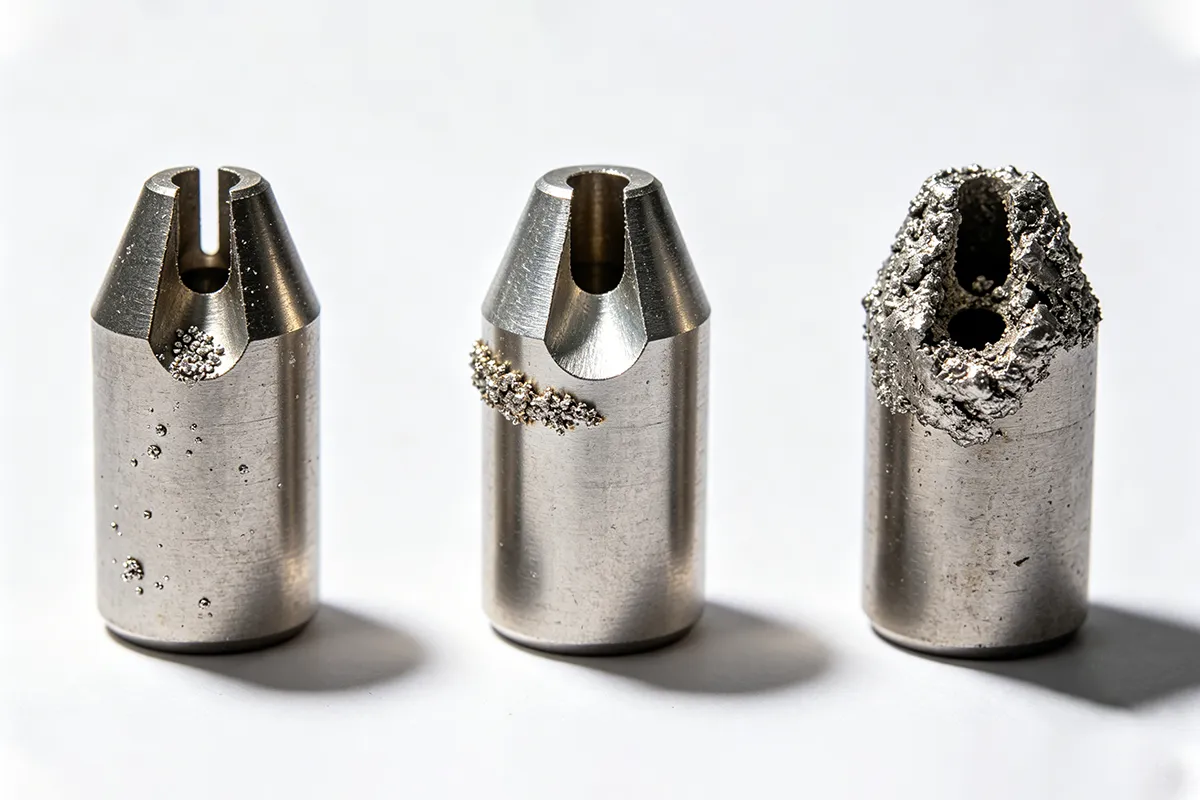
Durante la soldadura MIG/MAG, las gotas de metal fundido se transfieren a través del arco. La mayoría de ellas aterrizan en el baño de soldadura como estaba previsto. Algunas no lo hacen. Las que fallan aterrizan en el metal base circundante, en la punta de contacto y, con el tiempo, en la pared interior de la boquilla.
El problema se agrava con cada pasada. Una capa inicial fina atrae más acumulación. Una vez que se acumulan suficientes salpicaduras en el interior del orificio de la boquilla, el chorro de gas de protección se vuelve turbulento o se restringe. En ese momento, ya no está proporcionando una cobertura de gas consistente a la zona del arco - sólo está pasando por los movimientos.
Los efectos prácticos:
- Porosidad en la soldadura:El nitrógeno y el oxígeno atmosféricos llegan al baño de fusión.
- Perfil inconsistente del talón:La inestabilidad del arco provocada por la interrupción de la cobertura de gas se manifiesta en forma de cordones irregulares.
- Mayor desgaste de la punta:Las salpicaduras forman puentes entre la pared de la boquilla y la punta de contacto, provocando el fallo prematuro de la punta y cortocircuitos ocasionales.
- Reducción de la vida útil de la boquilla:Las salpicaduras acumuladas aceleran la erosión del orificio de la boquilla y del manguito aislante.
Ninguno de estos son fallos dramáticos. Son el tipo de degradación que se produce gradualmente, que es exactamente la razón por la que el mantenimiento de las salpicaduras se omite hasta que algo va visiblemente mal.
Procedimiento de limpieza correcto
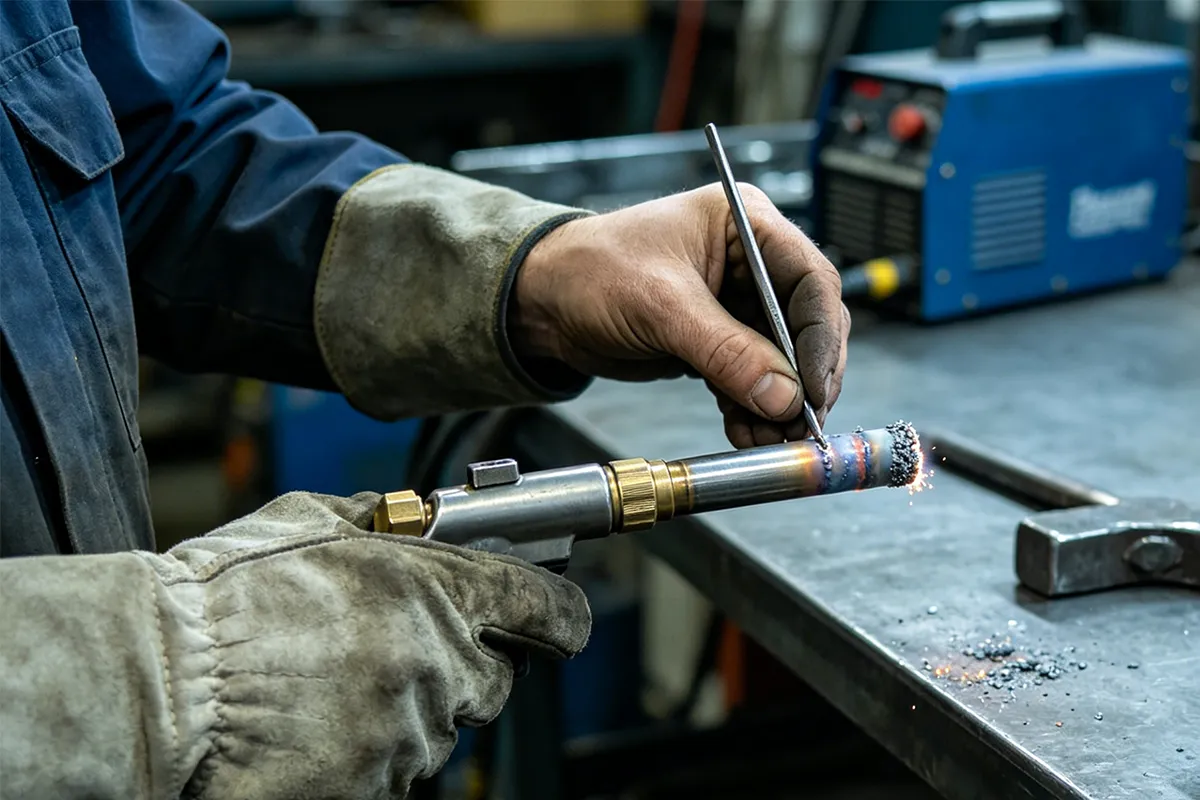
Paso 1: Utilice las herramientas adecuadas
El enfoque correcto es la eliminación mecánica con una herramienta de limpieza de salpicaduras especialmente diseñada para ello, normalmente un rascador plano o un escariador diseñado para el diámetro del orificio de la boquilla. Algunos soldadores utilizan un cepillo de alambre. Ambos funcionan. El objetivo es una eliminación controlada sin aplicar fuerza de impacto al cuerpo del soplete.
Paso 2: Limpie regularmente, no de forma reactiva
No espere a que las salpicaduras obstruyan visiblemente la boquilla. Incorpore la limpieza a su flujo de trabajo:
- En las líneas de producción:Limpie la boquilla cada 2-3 horas de arco, o antes si realiza pasadas de alto amperaje que generen grandes salpicaduras.
- En el trabajo intermitente:Compruebe la boquilla al comienzo de cada turno. Si ve que se acumulan salpicaduras más allá de la punta de contacto, límpiela antes de soldar.
- Después de la soldadura posicional:La soldadura por encima de la cabeza y vertical aumenta los índices de adherencia de las salpicaduras. Acostúmbrese a limpiar después del trabajo posicional.
Paso 3: Aplique el compuesto antimanchas
Antes de volver a la producción, aplique una fina capa de compuesto antisalpicaduras en el interior de la boquilla, ya sea una fórmula líquida en spray o en pasta, dependiendo de lo que haya disponible en su planta.
Los compuestos antisalpicaduras hacen dos cosas:
- Crean una superficie antiadherente que impide que las nuevas salpicaduras se adhieran a la pared de la boquilla.
- Hacen que el siguiente ciclo de limpieza sea más rápido y menos abrasivo, lo que prolonga la vida útil de la boquilla.
Una ligera aplicación antes de iniciar el turno es suficiente. Un exceso de compuesto puede contaminar la zona de soldadura o ensuciar la punta de contacto.
El único error que hay que evitar
⚠️ No golpee la boquilla contra la pieza o la mesa de soldadura para eliminar las salpicaduras.
Esto es extremadamente frecuente y causa verdaderos daños. La boquilla del soplete está sujeta por el forro aislante y el mecanismo de bloqueo del cuello del soplete. La fuerza de un impacto -incluso de lo que parece un golpecito rutinario- puede agrietar el forro aislante, aflojar el asiento de la boquilla o doblar el cuello del soplete con el tiempo. Ninguno de estos fallos es inmediatamente evidente. Aparecen más tarde como fugas de gas, desalineación de la punta de contacto o inestabilidad del arco que resulta frustrantemente difícil de rastrear hasta una causa.
Los cinco segundos que se tarda en utilizar un rascador adecuado no son opcionales. Es la diferencia entre un soplete que dura una temporada y otro que hay que sustituir al cabo de unos meses.
Limpieza de salpicaduras Referencia rápida
| Situación | Acción recomendada |
| Ligera acumulación (fase inicial) | Limpie el interior con spray antisalpicaduras antes de que se adhiera más |
| Acumulación moderada (capas visibles) | Raspe mecánicamente con un escariador de boquillas o una herramienta plana y, a continuación, aplique antisalpicaduras |
| Gran acumulación (orificio restringido) | Limpieza mecánica completa; inspeccione la punta de contacto y el manguito aislante en busca de daños |
| Después de pases de alto amperaje | Limpie la boquilla y compruebe el estado de la punta antes de continuar |
| Fin de turno | Limpie la boquilla, aplique una capa antisalpicaduras, inspeccione el desgaste antes del próximo uso |
Elegir el producto antimanchas adecuado
No todos los compuestos antisalpicaduras son iguales. Hay que comprobar algunas cosas antes de comprometerse con un producto para su uso en producción:
- Fórmulas sin silicona:Si sus piezas van a ser pintadas o recubiertas después de la soldadura, los compuestos antisalpicaduras a base de silicona pueden provocar fallos de adherencia aguas abajo. Utilice un producto sin silicona para cualquier ensamblaje que vaya a ir a acabado.
- Temperatura nominal:Confirme que el producto está clasificado para su rango de amperaje de funcionamiento. Los compuestos de baja clasificación se queman rápidamente a mayor calor y proporcionan poca protección.
- Compatibilidad con el material de la boquilla:Algunos compuestos agresivos pueden degradar las boquillas de aleación de cobre con el tiempo. Compruebe la ficha técnica del producto con el material de su boquilla.
En nuestra planta de producción de ZMDE, utilizamos una fórmula de pulverización sin silicona en todas las antorchas MIG/MAG. Es un coste de consumibles menor por turno, y prolonga de forma demostrable la vida útil tanto de la boquilla como de la punta; las matemáticas sobre el ahorro de consumibles lo justifican por sí solas.

Resumen del programa de mantenimiento
| Mantenimiento | Frecuencia | Notas |
| Limpieza interior de la boquilla | Cada 2-3 horas de arco | Aumente la frecuencia para aplicaciones con muchas salpicaduras |
| Aplicación antisalpicaduras | Antes de cada turno / después de cada limpieza | Utilice una fórmula sin silicona para los conjuntos pintados |
| Inspección de la punta de contacto | Cada 4-6 horas o cuando cambie el comportamiento del arco | Sustituir cuando el orificio esté visiblemente desgastado o alargado |
| Comprobación del manguito aislante | Semanal | Inspeccione en busca de grietas, decoloración o flojedad |
| Inspección completa de la antorcha | Mensualmente | Compruebe si el cuello, el cable y las conexiones están desgastados o dañados |
Conclusión: La limpieza de proyecciones es el control de calidad de la soldadura
El mantenimiento de la antorcha no parece formar parte de la calidad de la soldadura, pero lo es. La envoltura del gas de protección es lo que mantiene limpio el entorno del arco. Una vez que la boquilla se ve comprometida, usted ya no tiene el control de ese entorno, independientemente de lo bien que haya ajustado los demás parámetros.
Quince minutos de limpieza preventiva por turno harán más por una calidad de soldadura uniforme que revisar los ajustes de voltaje y velocidad del hilo que ya eran correctos para empezar.
¿Cuál es su rutina actual de limpieza de boquillas - y con qué frecuencia la acumulación de salpicaduras causa realmente problemas en su línea? Compártalo en los comentarios.
Explore más en la serie WeldSafe Essentials para obtener contenidos prácticos sobre seguridad en la soldadura y optimización de procesos de ZMDE.
Etiquetas: Mantenimiento de la antorcha MIG, boquilla de soldadura, eliminación de salpicaduras, antisalpicaduras, soldadura MIG, limpieza de la antorcha, consumibles de soldadura, seguridad en la soldadura, WeldSafe Essentials